Add raw device to VM in ESXi

So I’ve added a disk of one of my Linux machines to my ESXi host, created a new VM and wanted to add the physical disk to the VM as a raw device. (As a means of quick and dirty P2V.) However I found out that the “New raw disk” option is greyed out in my (stand alone) ESXi, so there is no way to add the physical disk to the VM.

Well, there is an option, using the CLI.

Enable SSH on your host, login and first find the device you added. In my case a Seagate device, so easily recognizable:

[root@localhost:~] ls /dev/disks/
t10.ATA_____KINGSTON_SA400M8120G_..._
t10.ATA_____KINGSTON_SA400M8120G_..._:1
t10.ATA_____KINGSTON_SA400M8120G_..._:5
t10.ATA_____KINGSTON_SA400M8120G_..._:6
t10.ATA_____KINGSTON_SA400M8120G_..._:7
t10.ATA_____KINGSTON_SA400M8120G_..._:8
t10.ATA_____ST8000DM0042D2CX188_...
t10.ATA_____ST8000DM0042D2CX188_...:1
t10.ATA_____ST8000DM0042D2CX188_...:2
t10.ATA_____ST8000DM0042D2CX188_...:3
vml.0100000000...
...

As you can see by listing the “/dev/disks” folder, there are 2 devices. The Kingston device is my boot SSD, the Seagate device (ST…) is the device I added.
The :1, :5, etc numbering refers to the partitions on the device. We want to passthrough the while disk, so we use “t10.ATA_____ST8000DM0042D2CX188_… ” (without any colon after it).

Now create the pointer file:

vmkfstools -z /vmfs/devices/disks/t10.ATA_____ST8000DM0042D2CX188_... /vmfs/volumes/datastore1/vm/seagate.vmdk

The first parameter is the disk we want to passthrough, the second parameter is the location where we want to save the vmdk (preferably save it with your VM).
(/vmfs/devices is a symlink to /dev, so you are actually working on the same location)

Close your SSH console, do not forget to disable your SSH service.

Now, edit your VM, add an existing disk, and select the VMDK you just created (seagate.vmdk in our example).

A tip, add the VMDK to the SATA controller of the VM, or it may not boot due to missing drivers.

Have fun, and don’t break production environments! 😉

Reduce ESXi OS partition size

When installing ESXi 7.0u2 to an internal SSD of 120GB, I noticed the system allocated all available storage as Virtual Flash. This leaves no space for a datastore, thus no local datastore is created. Pretty annoying, because this means you cannot have local VMs if you don’t install a second drive.

The good thing is, we can limit the OS partition size. The bad thing is, we can only do this at installation time. (Another bad thing, this is unsupported, but that’s not really an issue in a lab environment.)

How do we go about it?
Boot to the installer, at the ESXi boot screen press crtl+o to append additional setup parameters. The parameter you are looking for to set a custom size (example is 8GB) is:
autoPartitionOSDataSize=8192

According to KB81166, there also are other (more supported options):

  • Set the “minimal” size (33GB):
    systemMediaSize=min
  • Set the “small” size (69GB):
    systemMediaSize=small
  • Set the “max” size (uses all space available):
    systemMediaSize=max

Keep in mind, YMMV, and please keep the original (supported) default values when working in production environments.

Disable ESXi CVE-2018-3646 warning

When testing things in the homelab, I frequently work with older hardware.

This means that when you use ESXi, you might get the following warning:

This host is potentially vulnerable to issues described in CVE-2018-3646, please refer to https://kb.vmware.com/s/articles/55636 for details and VMware recommendations.

I typically chose to ignore the warning, as this is a lab anyway. And this is fine on a stand alone host, but it is pretty annoying when using vCenter.

So if you are in the same situation, here is how to disable the warning:
Open your host configuration, go to System, Advanced System Settings, click “Edit…”
The key you are looking for is:

UserVars.SuppressHyperthreadWarning

Set this to a value of 1, press “OK” and refresh the host. The warning should now disappear.

Please do keep in mind that the vulnerability is still present, you did not eliminate the risk, you only disabled the warning.

Xeon Phi in a desktop

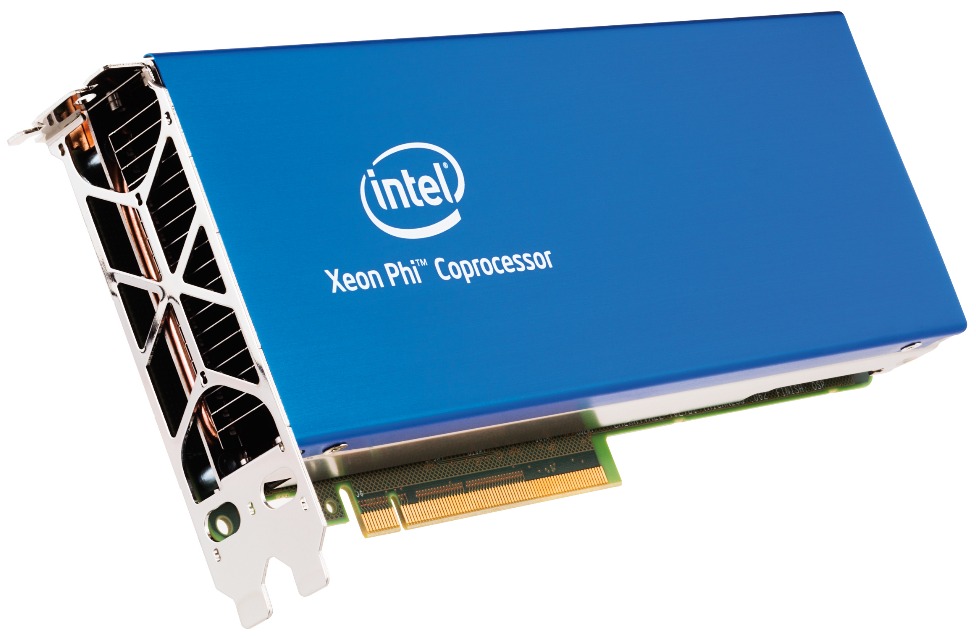
So Intel Xeon Phi coprocessors have become relatively cheap these days. You can find a PCIe coprocessor for 100€ or less on eBay. But can this little gem be ran in an ordinary desktop? (Or should we start calling it a workstation now?)

Browsing the internet, you’ll find that the Xeon Phi a rather picky component to install in your computer. It seems to need expensive workstation or server grade hardware. But times have changed, hardware has evolved. Is this still true?
Doing some research you’ll inevitably stumble upon Puget Systems, and their various articles about the Xeon Phi. They are a great source of knowledge, these guys truly seem to know what they are doing. But the info is not really up to date.

The Phi requires a full size PCIe slot, however this slot can be an 8x slot. So a motherboard that supports dual gpu’s these days, could be sufficient. The Intel Xeon Phi PCIe coprocessor needs above 4G decoding to work, most motherboards have this feature nowadays (maybe a bios update is required). So the odds are looking good… time to get started.

I got an old Intel Xeon Phi 5110P co-processor from eBay. Yup, the passively cooled version (why make it easy?). I then proceeded to order a 3D printed fan adapter and a powerful fan.
Next step was to fit it all in the case. To be honest, first time I had to cut out a part of the old trusty case, but the drive cage was in the way. This thing is lengthy with the fan mounted. (And it is heavy, a support has already been ordered.)
Do not try to boot without additional cooling, the card will overheat terribly fast, you won’t even get to see if it was working.
To be honest I kind of like the looks of the big blue card in my desktop, but it makes the computer sound like a jet engine. This had to be fixed, as my beloved wife was not pleased with the noise. In comes the old trusty fan controller, the fan speed has been lowered to 2000-2200 rpm, which makes it OK as far as noise goes. The Xeon Phi now idles at 70 degrees Celsius without touching it (acceptable to me).

So what components are in the desktop that was used?
Nothing fancy to be honest:

  • MSI X470 Gaming Pro (latest bios)
  • AMD Ryzen 5 2600X
  • 16GB RAM
  • AMD RX 570 GPU
  • Windows 10 Pro

So there you have it, an AMD CPU paired with an Intel Xeon Phi 5510, all while running Windows 10.

Hyper-V enable Nested Virtualization

Hyper-V supports nested virtualization, yes, even on Window 10.
How do you go about enabling this? The official documentation gives you a very good explanation:

https://docs.microsoft.com/en-us/virtualization/hyper-v-on-windows/user-guide/nested-virtualization

Want a quick summary instead? Throw the following commands in Powershell:

Set-VMProcessor -VMName <VMName> -ExposeVirtualizationExtensions $true
Get-VMNetworkAdapter -VMName <VMName> | Set-VMNetworkAdapter -MacAddressSpoofing On

This simply enables nested virtualization for your VM and fixes the networking (enables MAC address spoofing, so no NAT etc, just a bridge).

And disable dynamic RAM for your VM, it won’t work. The doc say so and it prevented my test VM to boot.